
Now you know how much space you have to work with, now it’s time to decide how much space you need (and then how much money you’ll need to do it!)
For me, I already had a pretty good set up in an attached garage, so I took measurements of all my furniture and set up a to-scale diagram of everything. I also evaluated how much storage I had (and how much more I’d really need because I had outgrown my storage already). I will say once I had my budget done I realized I’d have enough money to upgrade from my wire racks to some ikea bookshelves, so I adjusted my blueprints for that. If you know you’re going to furniture shop, try to be as accurate as possible with your furniture measurements.
When it comes to storage, there are thousands of ideas and suggestions out there. I perused Pinterest to come up with a plan, but before the move I kept all of my cut yardage sorted by color into plastic totes set on shelves, and all of my bolts on an open shelf. For my new setup, I decided on the following plans:
- Bolts on open bookshelves
- Yardage 1/3 - 3 yd cuts on comic book boards placed on end similar to large bolts (and labeled with fabric length if I get the energy?)
- Larger than 3 yard can be folded without the boards
- FQ folded and placed in bins (like 5" stackers) OR folded extra long and stacked on end to fill the length of cabinet better?
- Less than FQ leftovers wrapped with rubber band and sorted into tubs
- Less than 1/16th sorted into scrap bins or precut into 2.5" or 5" squares
- 5" stackers in bins that can be pulled out of shelves
- 10" stackers in the filing cabinet
- Rolly polly stacked on shelves
- Rulers on peg board or under lift top cutting table
- Cutting mats in storage under lift top cutting table
When creating a blueprint you can use graph paper or you can make a digital model. When my mom did hers, she used graph paper and then cut out to scale furniture from a second sheet of graph paper. I opted to use excel to make a to scale blueprint, or there are several apps out there that can do these functions as well. I recommend making several options to help you decide what size building you “need” vs “want”. For example, I found that with my existing furniture I could make a 12’x20’ building work, but it would be very snug and there would be no room for growth (or a bassinet for the new baby to nap in while I sew). I made several different sizes and then plugged them in to my budget to determine how big I could go without overextending my finances. I landed on a 16’x34’ as my max for my budget, but once I talked to my husband and we stuck some flags in the yard where it would go and studied the blueprints we settled on 14’x30’. Going a little bit smaller also left room in the budget for some important upgrades (will post about that when I talk budgeting and shed selection!)
The next step to the blueprint is to start to determine exactly where everything would go- and this includes outlets, lights, light switches, electrical boxes, peg boards, design wall, and other important things (like in the Midwest an hvac system for heating, cooling, and humidity control!)
When we’re talking electrical, it’s important that you think in terms of circuits. I won’t pretend to know anything technical about electricity, but I have electricians in the family who have dumbed it down enough for me to understand. Circuits are groupings of outlets/lights/etc. You’ll want to have an idea of what will be plugged into all your outlets or potentially running at one time and give this list to your electrician to make sure that your circuits are capable of supporting everything at once! There’s also the ability to upgrade a circuit to something called “CAFCI/CFCI”. What this means I couldn’t tell you, but what they do is detect if something on the line is sparking and then turn off the power to that circuit. I once had an iron suddenly start to spark, and luckily I was right there and able to unplug it, but because of this scare I upgraded both circuits my irons would be on to these protective circuits. If you’re going to have a longarm like my mom does, you’ll also want to make sure that you have a whole-house surge protector installed- this protects your electronics from surges (like lightning strikes or general power surges). I have a local one for my computer, but they make one that will protect everything in your shed once it is installed.
You’ll also want to make sure you think about the *height* all your outlets will be installed. If it’s next to your ironing board, consider having it at a higher height so that you don’t have to climb behind your ironing board to plug it in. I also am having my electrician husband add a light switch to turn off my iron outlet because I have a tendency to not unplug them (that way I know it’s off and everyone is safe!)
The possibilities are endless- having counters in your building? Consider under cabinet lights! Tend to have hot flashes? Add an extra outlet in a top corner of the room to install a permanent rotating fan! (My mom might have done that lol!) One can even have floor or ceiling outlets added if that would be convenient to you.
Here's what my blueprints look like.
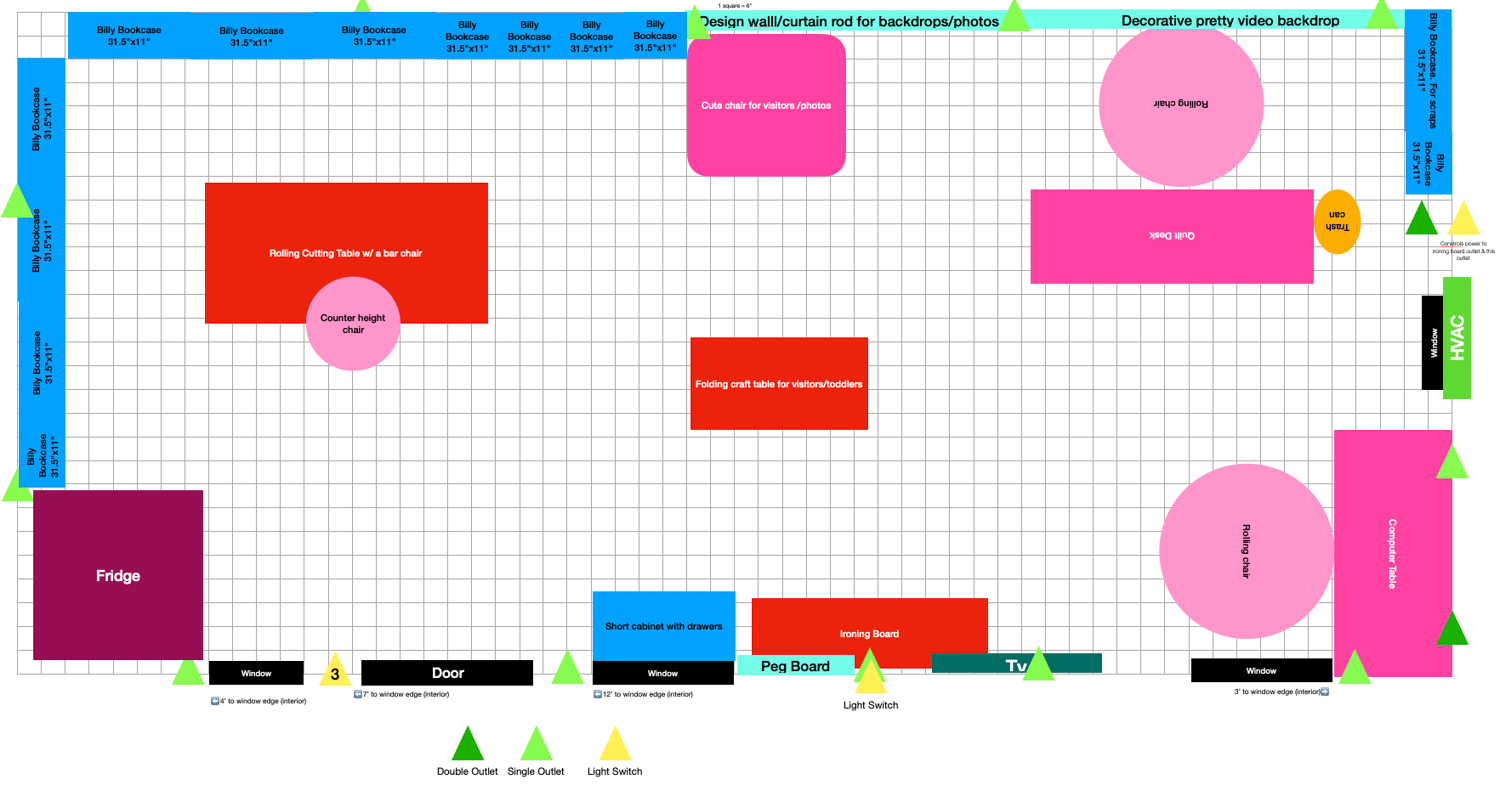
Because I honestly enjoyed the planning stage, here’s a few extra blueprint ideas (in a more average size portable shed) to get you started! I tried to estimate the storage space in ONLY bolts of fabric for comparison. I know most quilters have other types of fabrics that also need stored, but my brain prefers comparing spaces with one known object. (I could offer a calculated cubic foot, but if you're like me that is less helpful than telling me how many bolts would fit lol!) My blueprints above are at about 300 bolts excluding any storage under my cutting table.
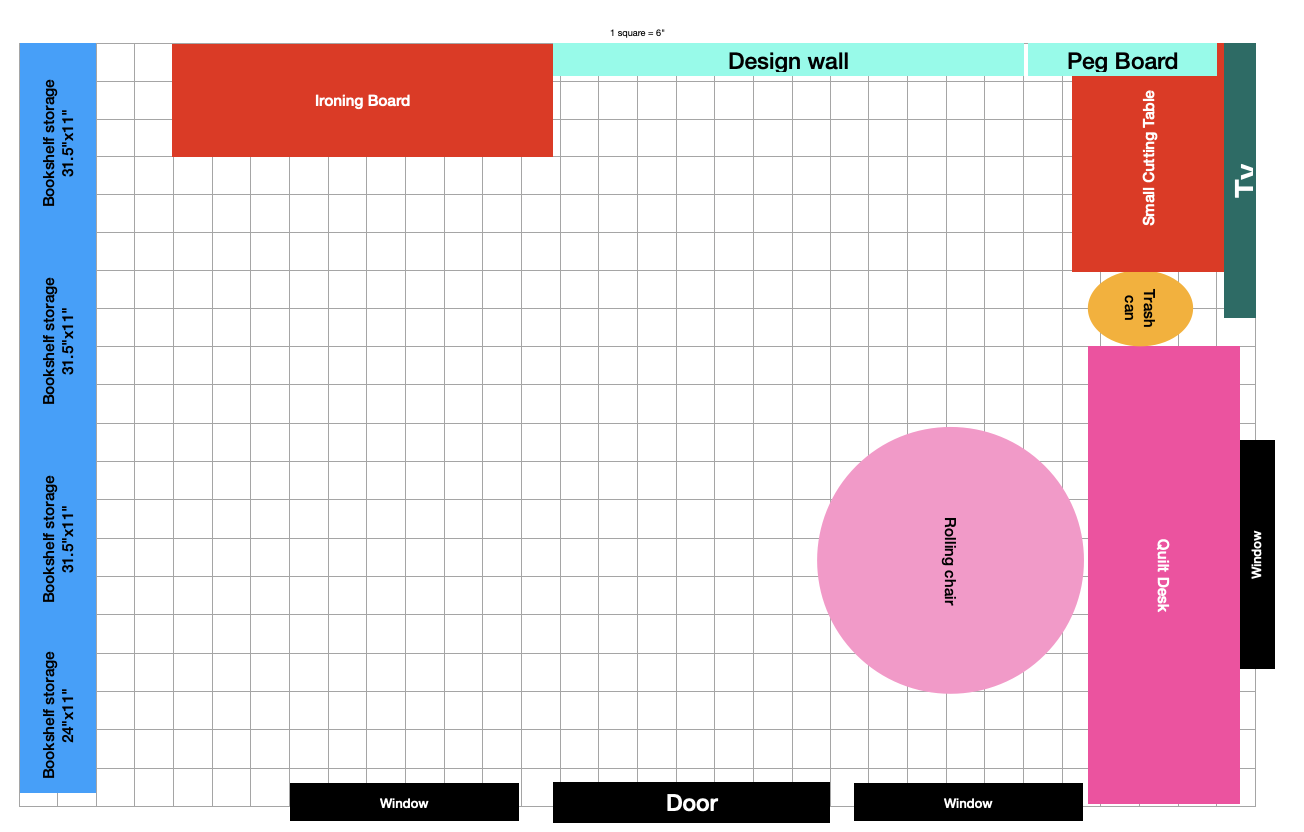
This is a 10'x16' barn with roughly enough storage for 100 bolts of fabric (assuming each bookshelf is tall enough for about 30 bolts total). That's a lot of storage for precuts or 2-3 yard cuts as well! There's also room to add an extra folding table and chair for a guest, or a nice sitting chair in front of a window for hand quilting.
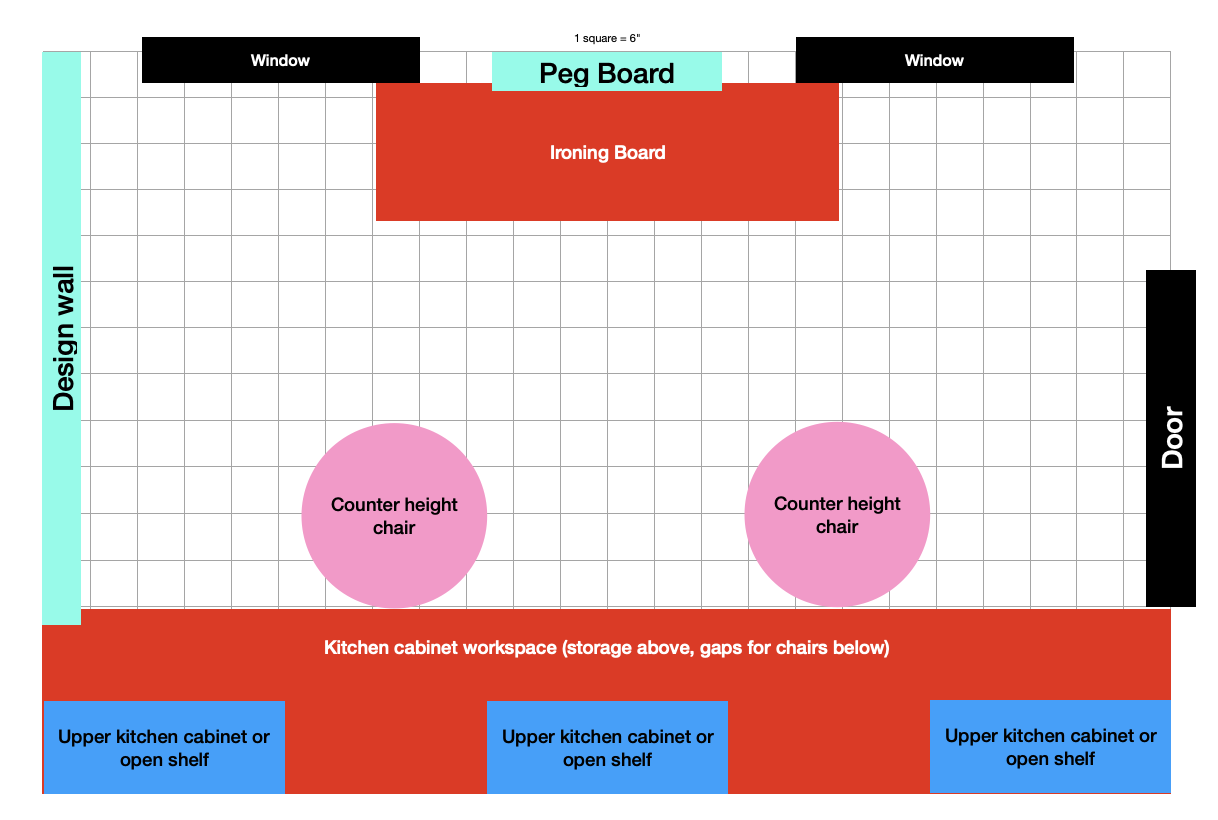
This is an 8'x12' shed designed to have kitchen cabinets as work spaces (not my preference but I see a lot of crafters/quilters like this set up!) Assuming there are lower cabinets below each upper (and tall enough to fit bolts), this would give a quilter enough space for 80-ish bolts of fabric, but probably this set up is much better designed for precuts and smaller yardages.